A few months ago, a friend told me about this cool fabric transfer method using a cleaning product called Citrisolv. I had never heard of the stuff, but I was intrigued. I finally had a chance to track some of this stuff down and give it a try. Soooo glad I did. It's my new obsession. Just come to my house and take a whiff--the whole kitchen smells like oranges.


Citrisolv Fabric Transfer Tutorial

Supplies:
*Citrasolv Natural Cleaner & Degreaser and small bowl
*Fabric (I used flour sack dish towels. Note: the tighter the weave, the better the transfer.)
*Image copied on a copy that uses toner (inkjet printed copies will NOT work--go to your local copy shop where toner-based copies will run you around $.08-.10 each)
*Wide paint brush
*Spoon
*Stack of newspaper
*Scotch tape or sewing pins
*Iron
*Towel
I found these tea towels, or flour sack towels, in a 2-pack at WalMart. They used to sell them a 5-pack for $6, like when I was making a ton of these Christmas tea towels, but no more. The good news is the 2-pack is actually cheaper per towel--only $.98 each!

All the graphics I used on my tea towels were from the fabulous Graphics Fairy. LOVE her site. She posts vintage clip art and images for free each day. I went with vintage graphics because then I didn't have to worry about how well the transfer was made--if it wasn't perfect it would just add to the vintage look! Here are a few of my copies made at the copy store with their toner-based copier. Note: Inkjet home printers and color copies will not work. Be sure to use REVERSE image for anything with text, or it will come out backward! Some of The Graphic Fairy's are, but some are not. If your image is not reversed, open it in photo editing software and flip it horizontally before printing.

Be sure to work in a well-ventilated area. Lay your fabric out on top of a stack of newspaper. I actually only had a couple of sheets, so I put a few plastic grocery sacks under it to give some cushion. It's good to have a little cushion to make the burnishing easier later. Put your copy image-side-down on your fabric and tape or pin in place (you don't want it to move or you'll have a blurry image). Pour a small amount of Citrosolv in a bowl and have your paint brush ready.
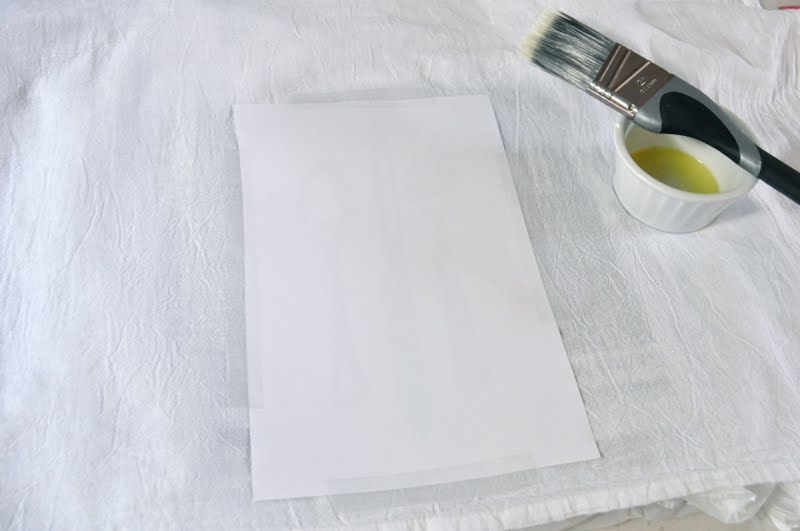
Dip your brush in the Citrisolv and wipe over the image until you can see it. Be careful not to use too much Citrisolv--if you soak it you may make your image blur!

This is the step that will make your image transfer--burnishing. Rub the entire image with the back of a spoon, being careful not to miss any spots.
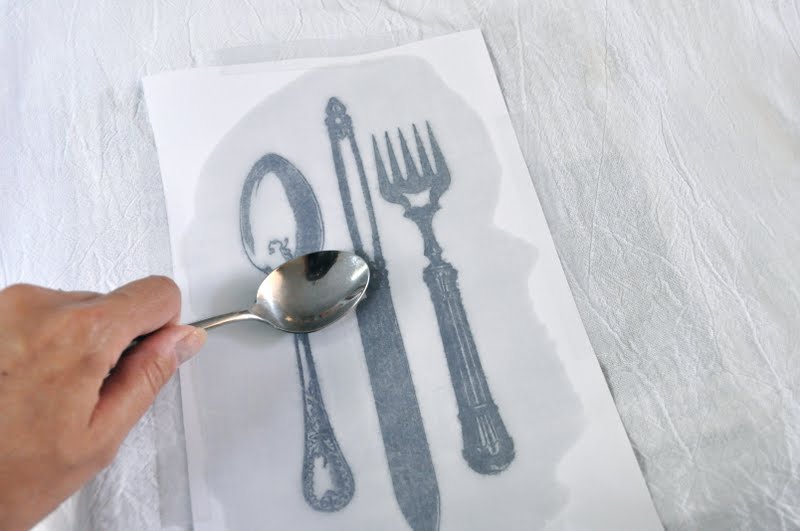
When you're sure you've covered it all, carefully life the copy off the fabric. If you do it slowly and notice you missed a spot, you may be able to replace it and burnish it a little further, but this is a good way to blur your image, so I wouldn't recommend it.

The last step I forgot to photograph, but now we need to heat set the image. Again, working in a well-ventilated area, place a towel over your ironing board (to protect it from smelling like Citrisolv!) and set your iron to the cotton or linen setting. Iron over the image to heat set it. And lastly, wash and dry it like normal to remove the Citrisolv completely from the fabric. That's it!

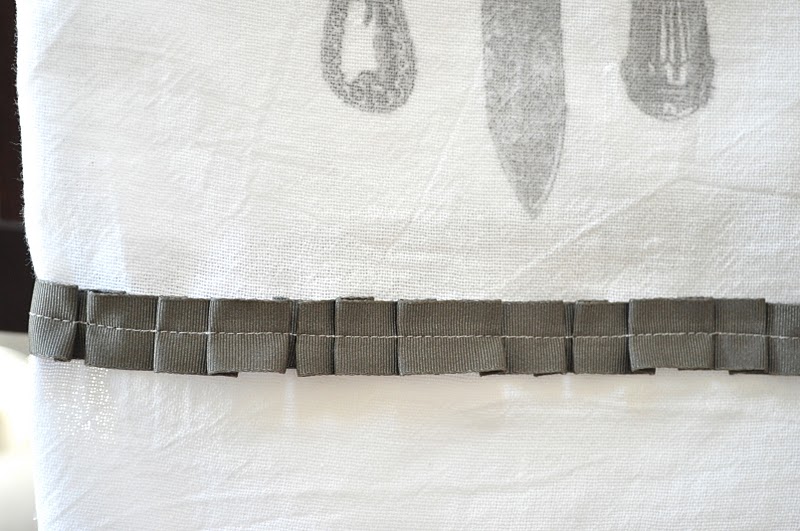
I did take a few extra minutes to add a little ribbon to a few of them, but again, this was a very quick addition. You can sew a straight piece of ribbon along the edge like on this towel:


I thought these would make a fun Halloween decoration, too, so I chose a couple of vintage Halloween images from The Graphics Fairy. Love this skull.


And this bat.


Here are a couple of other images I used for my french tea towels. . .


Can you see why I'm obsessed with this technique? Cheap, quick, and easy with gorgeous results. And wouldn't they make awesome handmade gifts for neighbors, birthdays, house-warming, etc.? My boys want to use that skull image on their annual birthday shirts instead of the appliqued numbers. Yes sir! And next fabric transfer project--pillows for my couch! Let's keep the Citrasolv flowing!

No comments:
Post a Comment